

Raypodo YF- RK3288 Ubuntu Introduction
Raypodo uses the RK3288 motherboard can build Android and Linux Ubuntu Operation system digital signage.
The YF-RK3288 Ubuntu system is based on the Ubuntu 32bit system and is currently maintained
- The desktop environment uses Lubuntu LXDE, which is simple and beautiful.
- Xserver uses GPU + RGA for 2D acceleration, runs smoothly, and occupies less CPU resources.
- For embedded platforms, streamline system services.
- Provide OpenGL and OpenCL support based on Arm Mali GPU.
- Provide video hard codec support based on Rockchip VPU + Mpp.
- Adapt to development frameworks such as QT, Docker, and Electron.
- Support LVDS, EDP, MIPI and HDMI display. Support dual-screen simultaneous display, dual-screen different display, dual-screen different display different sound (HDMI).
- Provide a series of interfaces to operate the onboard resource equipment. Basic information -User and password
- After the Youngfeel Linux Desktop system is powered on, it will automatically log in to the youngfeel user.
If there is a debugging serial port connected, the serial terminal will automatically log in to the root user
- After the Youngfeel Linux Desktop system is powered on, it will automatically log in to the youngfeel user.
- Youngfeel user password:123456
- Root user password: 123456
- Video hardware codec support
The integrated VPU of RK3288 has excellent video encoding and decoding capabilities. MPP is a set of video encoding and decoding APIs provided by Rockchip for VPU and is based on MPP. Rockchip provides a set of GStreamer codec plug-ins. Users can do video codec applications based on GStreamer according to their needs, or directly call MPP to achieve hardware codec acceleration.The system provides a test video file, located in /usr/local/test.mp4, the test file is 1080P, 24Fps, H264 encoding, Mp4 format.There are several ways to verify and develop video codec-related applications.
GStreamer
GStreamer 1.12 has been installed in the system.
/usr/local/bin/h264dec.sh Test hardware H264 decoding.
/usr/local/bin/h264enc.sh Test hardware H264 encoding.
Users can refer to these two scripts to configure their own GStreamer application.
- Mpv
The Mpv player provided by the system can directly call the rkmpp decoding plug-in. - FFmpeg
For Rockchip, FFmpeg only supports hardware decoding through MPP for the time being, and there is no hardware encoding support for the time being.
FFmpeg has been installed by default in the system, and users can use it directly.
- Confirm rkmpp decoder
- root@yf-rk3288:~# ffmpeg -decoders | grep “rkmpp”
- libavutil 56. 22.100 / 56. 22.100
- libavcodec 58. 35.100 / 58. 35.100
- libavformat 58. 20.100 / 58. 20.100
- libavdevice 58. 5.100 / 58. 5.100
- libavfilter 7. 40.101 / 7. 40.101
- libavresample 4. 0. 0 / 4. 0. 0
- libswscale 5. 3.100 / 5. 3.100
- libswresample 3. 3.100 / 3. 3.100
- libpostproc 55. 3.100 / 55. 3.100
- V….. h264_rkmpp h264 (rkmpp) (codec h264)
- V….. hevc_rkmpp hevc (rkmpp) (codec hevc)
- V….. vp8_rkmpp vp8 (rkmpp) (codec vp8)
- V….. vp9_rkmpp vp9 (rkmpp) (codec vp9)
- Test Command
- $ ffmpeg -y -c:v h264_rkmpp -i test.mp4 -an -vf \ hwdownload,format=nv12,format=yuv420p output.yuv
- Special attention: FFmpeg h264_rkmpp decodes AV_PIX_FMT_DRM_PRIME, which is
DRM frame data, if it is based on drm display, you can directly output the frame, otherwise, you need to use hwdownload to import
Line conversion.
For more information, please refer to the official website of FFmpeg.
- Special attention: FFmpeg h264_rkmpp decodes AV_PIX_FMT_DRM_PRIME, which is
- $ ffmpeg -y -c:v h264_rkmpp -i test.mp4 -an -vf \ hwdownload,format=nv12,format=yuv420p output.yuv
MPP
- Under Ubunut system, mpp related dev packages have been installed in the system.
For more related information and Demo, please refer to https://github.com/rockchip-linux/mpp/tree/develop/test
- Under Ubunut system, mpp related dev packages have been installed in the system.
OpenGL-ES
- RK3288 supports OpenGL ES1.1/2.0/3.0/3.1.
- By default, the system has provided complete OpenGL-ES support.
- Test command
$ sudo test_glmark2_normal.sh - WebGL support
In the Chromium browser, enter: chrome://gpu in the address bar to view the hardware acceleration under chromium support
OpenCL
- By default, opencl1.2 support has been added to the system, you can run clinfo built in the system to get platform OpenCL-related parameters.
root@yf-rk3288:~# clinfo
Number of platforms 1
Platform Name ARM Platform
Platform Vendor ARM
Platform Version OpenCL 1.2 v1.r14p0-01rel0-
git(a79caef).004e51a1e8b44487ebc4c7bfea5f60ee
Platform Profile FULL_PROFILE
Platform Extensions cl_khr_global_int32_base_atomics
cl_khr_global_int32_extended_atomics cl_khr_local_int32_base_atomics
cl_khr_local_int32_extended_atomics cl_khr_byte_addressable_store cl_khr_3d_image_writes
cl_khr_fp64 cl_khr_int64_base_atomics cl_khr_int64_extended_atomics cl_khr_fp16
cl_khr_gl_sharing cl_khr_icd cl_khr_egl_event cl_khr_egl_image cl_khr_image2d_from_buffer
cl_arm_core_id cl_arm_printf cl_arm_thread_limit_hint cl_arm_non_uniform_work_group_size
cl_arm_import_memory
Platform Extensions function suffix ARM
Platform Name ARM Platform
Number of devices 1
Device Name Mali-T760
Device Vendor ARM
Device Vendor ID 0x7501000
Device Version OpenCL 1.2 v1.r14p0-01rel0-
git(a79caef).004e51a1e8b44487ebc4c7bfea5f60ee
Driver Version 1.2
…
Screen Rotation
If you need to rotate the display direction of the system by default, you can
Modify the direction of the corresponding display device in /etc/default/xrandr
youngfeel@yf-rk3288:~$ cat /etc/default/xrandr
#!/bin/sh
# Rotation can be one of ‘normal’, ‘left’, ‘right’ or ‘inverted’.
V0.03 2020.12.07V0.03 2020.12.07
# xrandr –output HDMI-1 –rotate normal
# xrandr –output LVDS-1 –rotate normal
# xrandr –output eDP-1 –rotate normal
# xrandr –output DSI-1 –rotate normal #MIPI interface
# xrandr –output VGA-1 –rotate normal
# xrandr –output DP-1 –rotate normal
For platforms equipped with a touch screen, if you need to rotate the direction of the touch screen, you can
Modify the three values of SwapAxes / InvertX / InvertY in /etc/X11/xorg.conf.d/05-touchscreen.conf.
root@yf-rk3288:/etc/X11/xorg.conf.d# cat 05-touchscreen.conf
Section “InputClass”
Identifier “ff_touchscreen”
MatchIsTouchscreen “on” #触摸使能 on 打开触摸 off 关闭触摸
Driver “evdev”
Option “SwapAxes” “on”
#xy 触摸坐标交换 on 交换 off 不交换
# Invert the respective axis.
Option “InvertX” “on” #x 轴坐标反向 on 反向 off 不反向
Option “InvertY” “off”
#y 轴坐标反向 on 反向 off 不反向
EndSection
System language
The system defaults to Simplified Chinese, if you need to modify the language, you can edit the file /etc/default/locale
root@yf-rk3288: vim /etc/default/locale
LANG=”zh_CN.utf8″ //中文
LANG=C.UTF-8 //英文
On-screen keyboard
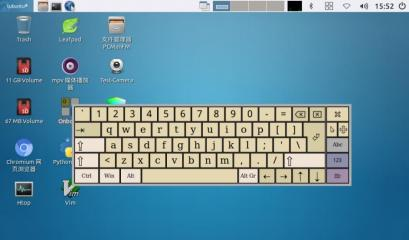
The official Ubuntu system comes with an on-screen keyboard, you can click to open it in the menu bar:
Sound configuration
The system has 2 audio outputs, which are the audio outputs of the speakers and HDMI devices. Here are the audio settings.
Specify audio device from the command line
The audio files that come with the system are in the /usr/share/sound/alsa/ directory, please check the sound card device before playing:
root@yf-rk3288:~# aplay -l
**** PLAYBACK hardware device list ****
card 0: rockchipes8323c [rockchip,es8323-codec], device 0: ff890000.i2s-ES8323 HiFi ES8323 HiFi-0 []
Sub-device: 1/1
Subdevice #0: subdevice #0
card 0: rockchipes8323c [rockchip,es8323-codec], device 1: ff890000.i2s-i2s-hifi i2s-
hifi-1 []
Sub-device: 1/1
Subdevice #0: subdevice #0
Then specify the sound card to play audio, where device 0 of sound card card0 corresponds to the headphone port, and device 1 of card0 corresponds to HDMI. The general audio playback command is aplay -Dhw:0,0 Fornt_Center.wav, but the audio file that comes with the system is mono, so in order to prevent playback failure, you can follow the following command to play:
#Select the headphone port to output audio files
root@yf-rk3288:/usr/share/sounds/alsa# aplay -Dplughw:0,0 Front_Center.wav
Now playing WAVE’Front_Center.wav’: Signed 16 bit Little Endian, frequency 48000Hz, Mono
#Select HDMI output audio file
root@yf-rk3288:/usr/share/sounds/alsa# aplay -Dplughw:0,1 Front_Center.wav
Now playing WAVE’Front_Center.wav’: Signed 16 bit Little Endian, frequency 48000Hz, Mono
Start the application at boot
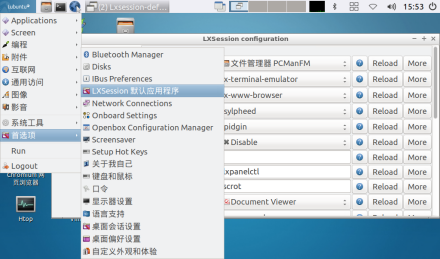
In the system, you can set the application to start automatically when it is turned on according to the needs of the user. In the system menu bar, select
Select: Preferences -> LXSession default application to open the setting interface. In the settings interface
In the Launching applocations column, you can set the default opening method of the application:
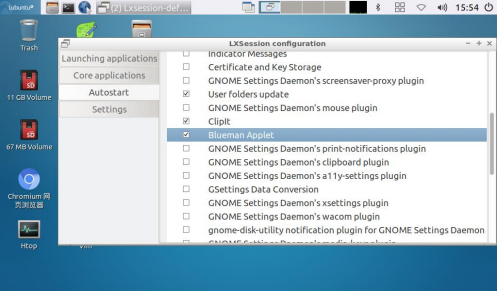
In the Autostart column, you can select the application that the user needs to start up. For example, Bluetooth is started by default when it is powered on.
If you need to make it do not start automatically when booting, just uncheck the Blueman Applet, and you can realize that the bluetooth does not start when booting.
Related product, more question, please contact Raypodo sales and engineer to support your request.
Error: Contact form not found.


Leave a Reply
You must be logged in to post a comment.